This page contains affiliate links, view the disclosure for more information.

This article is all about running stitch embroidery. Learn with tutorials on the running stitch, project ideas and tips.
What Is the Running Stitch?
The running stitch is hands down one of the most simple, versatile stitches in embroidery. It’s all about those straight, evenly spaced stitches that create a neat, continuous line. Whether you’re outlining shapes or adding some fun linear patterns, this stitch is a go-to for beginners because it’s super easy to pick up and can be used for just about anything! 🌿

Running Stitch Step-by-Step Instructions
Ready to get stitching? Grab your fabric, thread, and needle, and let’s dive into these easy-peasy steps:
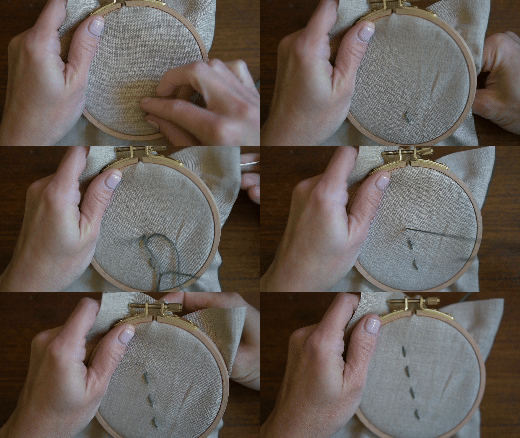
- Start by inserting the needle from the back of the fabric to the front at your chosen starting point. Pull that thread through until the knot catches.
- Next, insert the needle back into the fabric a short distance ahead of your first stitch, creating a small, straight stitch.
- Pull the thread through and repeat, making sure your stitches are evenly spaced and nicely aligned in a straight line.
- Keep going until you reach the end of your line or design.
- Finally, secure the thread at the back of the fabric with a knot or weave it through existing stitches. Voila! You’ve mastered the running stitch! ✨
Running Stitch Video Tutorial
Ready to see the running stitch in action? 🎥 Check out this video tutorial to see each step of creating that classic stitch.
Next Up
Get project ideas and tips on the running stitch below, or get ready to level up your skills with your next stitch: the seed stitch! 🌱
More on Running Stitch Embroidery: projects & tips
Whether you’re just starting out or looking to refine your skills, the running stitch is a must-master technique! This simple yet versatile stitch is your go-to for creating straight lines, outlines, and linear patterns in all your embroidery projects. In this guide, we’ll dive into embroidery project ideas, plus tips and tricks to help you perfect this essential stitch.
Use Cases
- Creating outlines: This stitch is perfect for defining the edges of your shapes and designs.
- Adding geometric elements: It’s ideal for crafting stripes, borders, or geometric patterns.
- Simple embellishments: Use it to add little details that elevate your fabric projects.
Embroidery Projects with the Running Stitch
1. Dotted-line text on a customized sweatshirt, shirt, or tote bag
Get ready to create a unique sweatshirt, shirt, or tote bag with the running stitch!
- Materials: Sweatshirt, shirt, or tote bag; embroidery thread; needle; hoop; fabric marking pen.
- Instructions:
- Choose a simple design or an inspiring quote.
- Plan your design and use a fabric marking pen to sketch it out on your chosen item.
- Tip: For text, go big! Running stitch text is best over larger areas, so opt for large letters with smaller stitches for that perfect readability.
- Use the running stitch and customize your project! ✨
2. Personalized Towels
Give a cozy, custom vibe with bordered kitchen towels. 📣 Perfect for wrapping up sourdough bread as a gift!
- Materials: Plain towel; embroidery thread; needle; fabric marking pen.
- Instructions:
- Use a fabric marking pen to draw a straight line (or lines) on your towel.
- Grab your needle and thread, then use the running stitch to create evenly spaced stitches along the marked line. 🌿
- Variation: Multiple running stitches
- Feeling adventurous? Repeat the process to add multiple lines for even more depth to your design.
- Play around with mirrored or contrasting stitches on each border line and/or use complementary colors to really make your design your style!
Tips and Tricks for Perfecting Your Running Stitch Embroidery
1. Keep your stitches even
- Tip: To achieve that neat and polished look, keep your stitches evenly spaced and consistent in length. Grab a fabric marking pen to help with spacing if needed.
2. Practice straight lines
- Tip: Before diving into your main project, take some time to practice stitching straight lines on scrap fabric. This will help you get a feel for the technique and improve your control.
3. Sketch your design
- Tip: Plan or transfer your design onto the fabric before you start stitching. This way, you’ll work more efficiently, and your design will have that polished look you’re going for.
4. Avoid pulling too tightly
- Tip: Keep that thread tension just right! Pulling too tightly can make your fabric pucker, so aim for a consistent, gentle tension as you stitch.
Let’s Review Running Stitch Embroidery
The running stitch is a foundational technique in embroidery you absolutely need in your toolkit! Its simplicity and versatility make it ideal for crafting clean lines, outlines, text, and decorative patterns. Ready to give the running stitch a whirl? Gather your materials, follow the steps above, and start creating stunning embroidery projects! ✨
And don’t stop here—explore the next stitch in your journey, the seed stitch!